
Windows 10 ships with many recovery features that can help you to fix most problems you may come across. One of these functions includes System Restore Point, which allows you to take your PC back to a point in time where everything correctly worked if there are problems due to a recently installed update, driver, or app.
Typically the operating system will create a new restore point before changes are made to your computer, and you can also create restore points manually. However, in this Windows 10 guide, we'll walk you through the steps to create a desktop shortcut with a special script, which it'll allow you to create new restore points with a simple double-click.
How to check if System Restore Point is enabled in your PC
Before diving in, you first need to make sure that System Restore Point is enabled on your PC:
1. Open the Start menu, do a search for Create a restore point, and press Enter.
2. On System Protection, under Protections Settings, verify whether the setting is turned On or Off. If the system drive's protection is On, then no further actions are required, and you can jump to "How to create a System Restore Point shortcut script" below.
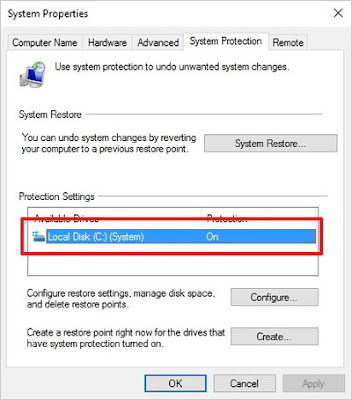
If it's the system protection is Off, select your PC system drive, and click the Configure button.
3. Select the Turn on system protection option.
Click Apply.
Click OK.

How to create a System Restore Point Shortcut script
To create a restore point with a double-click follow the steps below:
1. Right-click on the desktop, select New, and click Shortcut.
2. On the Create Shortcut wizard, type the this command:
cmd.exe /k "wmic.exe /Namespace:\\root\default Path SystemRestore Call CreateRestorePoint "My Shortcut Restore Point", 100, 7", and click Next.
Note: The command basically tells the operating system to open Command Prompt and use Windows Management Instrumentation Command-line (WMIC) tool to create a system restore point of your Windows 10 PC.
3. Enter a descriptive name for the shortcut, and click Finish.
4. Right-click the newly created shortcut, and select Properties.
5. If you want to add a more appropriate icon, click the Change icon button.
6. In the field type the following path C:\Windows\System32\imageres.dll and press Enter.
7. Select the icon you want and click OK. Click the Advanced button.
8. Select Run as administrator.
Click OK.
Click Apply.
Click OK to complete the task.
Finally, double-click the desktop shortcut to test if a system restore point can be created. If you get a Command Prompt with the output identical to the screenshot below, then everything is working correctly.
Now the next time you're about to install a new app, driver, or you're planning to modify anything on your PC, you can quickly double-click the shortcut to create a new restore point, instead of going through a number of other steps.
Post a Comment